| The Paperless Office |
| Contact screens |
| Main Page |
| Browse Screen |
| Adding a Contact |
| Documents screens |
| Scan List Screen |
| Insert Image |
| Scanner Setup |
| Scan Manager |
Insert Image
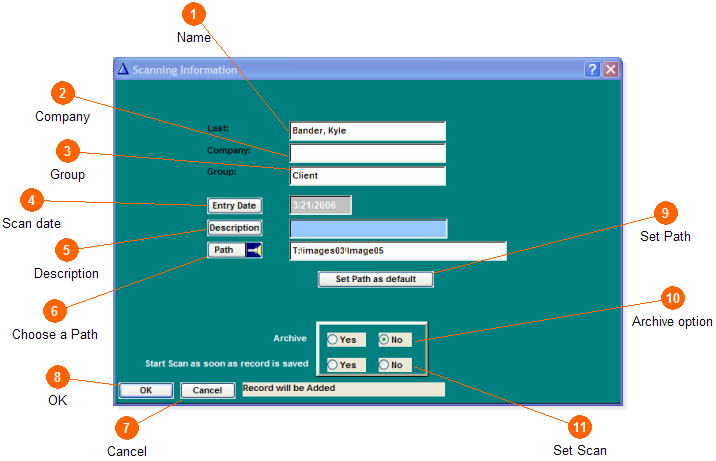
Enter the information needed to store images and keep your images organized.
 Name
Name This field wil be auto filled with the contacts name that you are scanning under.
 Company
 This field will be auto filled if you added a company to this contacts information. You may add or change the company in this feild if you need to for this scanned image. This will only change the company name for this one scanned image.
 Group
Group This field will be auto filled if you have assigned this contact to a group. You may add or change the group name for this scanned image. This will only change the group for this image.
 Scan date
 This field will auto fill with the current date. This will give you a record of the date the image was scanned on. You can change this field to reflect another date.
 Description
 Add a description to your scanned image to help with organization. Examples of descriptions would be reciepts, invoices, insurance forms, etc. You may store a list of common descriptions by clicking on the button.
 Choose a Path
 The path is where your scanned image is to be stored. You can create the path by clicking on the 'Path' button and clicking on the files where you would like your images to be stored. We suggest creating an images folder on your hard drive to store the scanned images.
 Cancel
 Cancel the scan process and do not save any information that was entered.
 OK
OK Once you have filled in all of the neccessary information you will click 'OK' to begin scanning.
 Set Path
 The first time you choose your path you can click 'Set Path as Default' to have this path be used for all of your scanned images.
  Archive option
 With the arcive option set on 'NO' the scanned image will be displayed under the current images tab. When the arcive option is set to 'YES' it will be displayed under the arcived tab. This option will default to 'NO' after the image is scanned.
 Set Scan
 With the Set Scan option set to 'YES' you will begin scanning once you click 'OK'. With this option set at 'NO' you will be able to go to the scanning options before the scan begins.
|
Insert Image
Enter the information needed to store images and keep your images organized.
|