| The Paperless Office |
| Contact screens |
| Main Page |
| Browse Screen |
| Adding a Contact |
| Documents screens |
| Scan List Screen |
| Insert Image |
| Scanner Setup |
| Scan Manager |
Scan List Screen
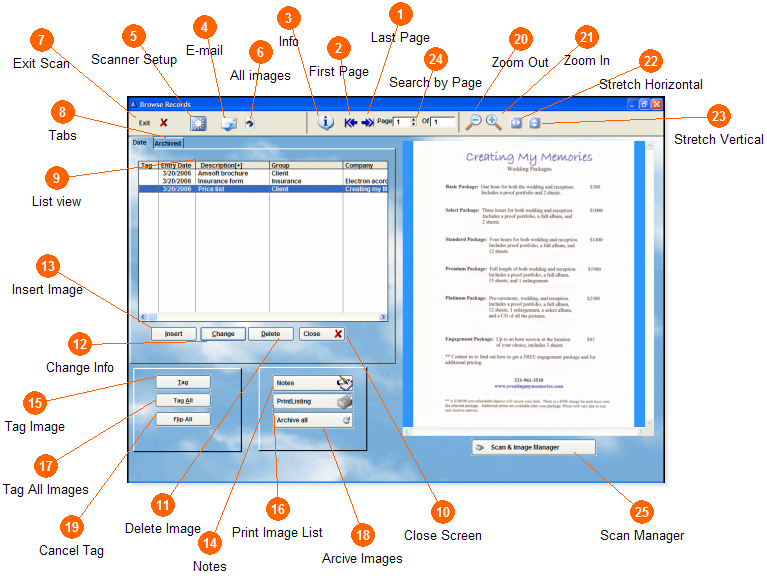
With each contact you will have a Scan List Screen. This page will allow you to view, print, and organize your scanned images.
 Last Page
 When a scan has multiple pages this will take you to the last page of the scan.
 First Page
 When a scan has multiple pages this will take you back to the first page when looking through the other pages.
 Info
Info Click on the info button to see information about your scanned image such as file size, where it is located on your computer, and when it was created. Click the info button again to go back to the original Scan Listing Screen.
  E-mail
 E-mail all tagged images.
  Scanner Setup
 Brings up your scanning options screen. See the Scanner Setup module for more information. See the Scanner Setup module for more detailed information.
 All images
 View all scanned images from every contact. Search for a specific scanned image in the Paperless Office program.
 Exit Scan
 Exits out of the Scan List Screen. It will take you back to the Contact Browse Screen.
 Tabs
Tabs The date tab will show all current scanned documents. The arcive tag will show all documents that you have ever arcived.
  List view
 Change how your images are listed. Click on the column that you want your images to be organized by. They will be put in alphebetical order. Click the same column again and they will be in the reverse order. Originally your images will be stored in the order they are scanned.
 Close Screen
 Close out of the Scan List Screen and return to your Browse Contact List.
 Delete Image
 Delete a scanned image by highlighting the entry and clicking delete.
 Change Info
 Allows you to change information about the image such as the description, group, etc.
 Insert Image
 Begin the process to add a new image to this contacts scan section. See the Insert Image module for more detailed information. See the Insert Image module for more detailed information.
 Notes
Notes Make any comments about the highlighted image that you may need to know for later purposes.
 Tag Image
 Select specific images by highlighting them and clicking the tag button. This function can be used with emailing, printing image lists, etc. Click again to untag the entry.
 Print Image List
 Print a list of all images in this contacts current image list, or print a list with only selected images by using the tag button. The list will show the date, description, and the path of your images.
 Tag All Images
 Tag all of the images in this clients scanned images list.
 Arcive Images
 Arcive all images from the current list. They will now be displayed under the arcive tab.
 Cancel Tag
 Allows you to flip all tagged images to untagged with one button.
 Zoom Out
 Zoom out to view the whole image on the screen.
 Zoom In
 Zoom in on your image for a up close view.
 Stretch Horizontal
 Stretch the image that is currently being viewed to the full horizontal view.
 Stretch Vertical
 Stretch the image that is currently being viewed to the full vertical view.
 Search by Page
 When a scan has more than one page look through one page at a time by using the up and down arrow buttons.
 Scan Manager
 Use this button to take a closer look at already scanned images and for further options with your images. See the Scan Manager module for more details. See the Scan Manager module for more detailed information.